Tuesday, 28 March 2017

Windows cannot find the local profile and is logging you on with a temporary profile


This is definitely in my top 10 list of most frustrating errors. There are about 100 different solutions floating around and sometimes one of them works and sometimes none of them work. Well here is solution 101...

The error of course happens as you log onto a computer with a domain profile. It takes a long time to load and then you get a message that you were logged on with a temporary profile. Event Viewer will record:

"Windows cannot find the local profile and is logging you on with a temporary profile. Changes you make to this profile will be lost when you log off."


If you aren't particularly worried about whatever was in the profile before, you can sometimes solve this by simply changing the profile directory in Active Directory Users and Computers. Then reboot the machine and log back in.

For example in the pic below, the profile path used to end with a folder called 'newuser' and changing it to just 'new' created the profile folder newly on the server and after rebooting the pc in question, it logged in fine.




Sunday, 26 March 2017

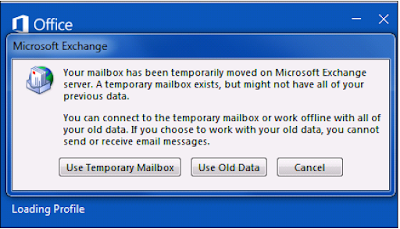
Your mailbox has been temporarily moved on Microsoft Exchange server.


Scenario:

You've switched to Office 365. You've connected Outlook to the Office 365 servers, but now Outlook is complaining: "Your mailbox has been temporarily moved on the Microsoft Exchange server. A temporary mailbox exists, but might not have all your previous data..."


The Problem:

You likely didn't delete and create a new Outlook profile using the Control Panel's Mail (Microsoft Outllok 2016) icon.


If you create the new profile using the Mail (32 bit) icon, you will get the above error every time you open up Outlook.

The Solution
Create a new Outlook profile using the Control Panel's Mail (Microsoft Outllok 2016) icon, not the Mail (32 bit) icon.


Certificate errors connecting to Office 365 with Outlook 2016


Scenario
You've just migrated from Exchange to Office 365. You've setup Outlook to connect to Office 365, but now Outlook 2016 is complaining about Office 365's certificate.

The Problem
Outlook 2016 is still trying to use the autodiscovery server registered in your Active Directory. Outlook tries to lookup the autodiscover information in the AD prior to using DNS. You have to stop Outlook from doing that.

Solution
On the client machine, you need a registry entry to stop Outlook clients from using the Active Directory's autodiscover information (supplied by your old Exchange Server).

You need dword entry called ExcludeSCPLookup in HKEY_CURRENT_USER\SOFTWARE\Microsoft\Office\16.0\Outlook\AutoDiscover.

You can put the following in a .reg file and install the entry by double clicking it. If your machine doesn't have permission to install, open up the registry editor and import the .reg file you create.
Windows Registry Editor Version 5.00
[HKEY_CURRENT_USER\SOFTWARE\Microsoft\Office\16.0\Outlook\AutoDiscover]
"ExcludeHttpsRootDomain"=dword:00000001
"ExcludeSCPLookup"=dword:00000001
[HKEY_CURRENT_USER\SOFTWARE\Microsoft\Office\16.0\Outlook\AutoDiscover\RedirectServers]
"autodiscover-s.outlook.com"=hex(0):
"autodiscover.hotmail.com"=hex(0):


Tuesday, 21 March 2017

Emailing an attachment in C# through Office 365

Scenario: You want to send an email with attachment in C#, using an Office 365 account.

Solution:

SmtpClient client = new SmtpClient("smtp.outlook.office365.com");
client.Port = 587;
client.EnableSsl = true;
client.UseDefaultCredentials = false;
System.Net.NetworkCredential cred = new System.Net.NetworkCredential("user@callerip.ca", "passwwrd");
client.Credentials = cred;
                

MailAddress from = new MailAddress("user@contoso", "Caller IP");
MailAddress toEmail = new MailAddress("toaddress@email.com");
MailMessage mm = new MailMessage(from, toEmail);
mm.Subject = "Your subject";
mm.Body = "Message in email body.";
Attachment a = new Attachment(filename);
mm.Attachments.Add(a);
mm.BodyEncoding = UTF8Encoding.UTF8;
mm.DeliveryNotificationOptions = DeliveryNotificationOptions.OnFailure;
client.Send(mm);

After O365 move, the iPhone is still asking for Exchange Server info (not using autodiscover)

Scenario: you moved to Office 365 from your own hosted solution. You have deleted your old iPhone email account and are trying to set it back up using autodiscover. You entered the email address, the password and an account description and instead of setting up automatically it is asking for server info etc.

Solution: change the description field. If you use the same description as before (like "XYZ Corp") it uses some cached setting. Change to "XYZ Corporation" and it will work.


Monday, 20 March 2017

Custom URL for Office 365 Webmail

Setup a CNAME record pointing mail to mail.office365.com.

Your users are probably used to going to "mail.yourcompany.com" to get their web mail. With Office 365, the standard URLs are portal.office365.com or login.onmicrosoft.com, which takes you to a list of office applications, including mail.

You can direct your users directly to Office 365 webmail by using mail.office365.com. Or you can setup a CNAME that points mail to mail.office365.com.

Now anyone going to mail.yourcompany.com gets sent to mail.office365.com which is the Office 365's webmail.

Timeout while uploading a PST file to Azure for Office 365


"Could Not Finish the Operation Within Specified Timeout"

Don't despair. Use the /NC:2 switch on azcopy.exe. That limits the number of concurrent operations to 2 - which seems to be the magic number to prevent the timeout error. We were able to upload 5 PST files totalling 5GB once we added /NC:2 to the azcopy.exe command.

See https://docs.microsoft.com/en-us/azure/storage/storage-use-azcopy for the specs.


Import Export Mail Role

After using the azcopy tool to upload individual PST files to Office 365, don't begin the mapping and import process until your administrator account has the Mailbox Import Export role.

Here is a link from Microsoft on how to do it: https://answers.microsoft.com/en-us/msoffice/forum/msoffice_o365admin-mso_dep365/mailbox-import-export-role/0da4f7a2-006f-4aea-90c7-fadc39a2aaea

Essentially, you find the Exchange Admin Centre, click permissions, and then add the role to the Organization Management group (which your administrative user is a member of).